Dragu
roleplay extraordinaire
Hey, you there!
You, with the mask! Do you want to be more than a mall-cop with a gun? Do you want to handle threats swiftly and effectively, without losing Integrity to a Lambda-wannabe with a peashooter every sweep?
Now, your life as a CP isn't an easy one. Even though you sit on your ass handling paperwork and being a menace most of the time; sometimes, when push comes to shove, you have to use that kill-bind and risk your life in close-ranged S2K combat. And God knows that when that happens, you don't want to be the embarrassment of the Protection Team by dying first.
Let me give you some insight into real-life inspired CQC tactics that have worked in HL2RP and will, if applied correctly, not only turn you and your colleagues into a force to be reckoned with, but also make your combat more immersive and, hopefully, smoother.
1. Before you even engage, use hand signals and gestures to stay coordinated. Use of the /mev or /mec command is paramount in stealth missions. Vocoder beeps travel for miles.
2. Ensure that all of your team members are well-equipped and prepared for a worst-case scenario. Running out of ammo during an encounter or bleeding out out of lack of sufficient medical items is embarrassing. If you're high-ranking, consider the decision to equip your subordinates with better equipment for the sweep, to sway the odds in your favor.
3. Having a unit with riot/shield training on your team is extremely helpful, as sometimes covering fire will not suffice. One shield can be more than enough to provide mobile cover for an entire team while advancing or retreating.
4. When operating in a building, stay out of the "kill zone" (the middle of the room). It makes you extremely vulnerable to surprise attacks. When you flood/breach a room, always move in along the walls, especially if you don't have anyone with a shield on your team.
5. Team Leader defaults to the highest integrity unit in the team. If the Leader is incapacitated, you are expected to make swift decisions to select another.
Covering Fire
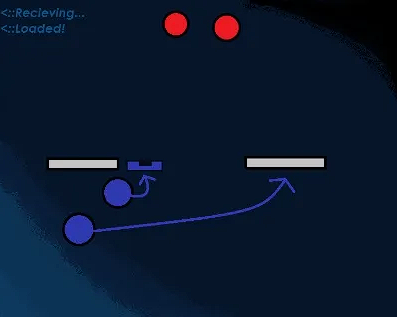
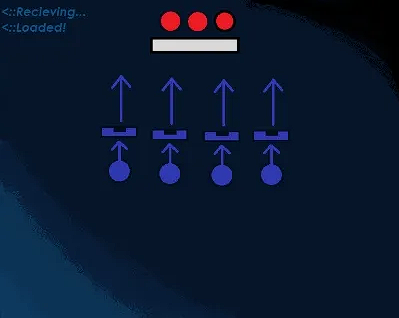
Two combatants stack up. One begins to run to another location while the other opens fire on targets that are a potential threat to the runner.
Primarily used to hold positions and maneuver before engaging.
Reaction to Contact
The front part of the squad should return fire immediately. While they do so, the back part of the squad quickly moves into cover.
Once done, provide covering fire for those at the front. The front combatants move into cover last.
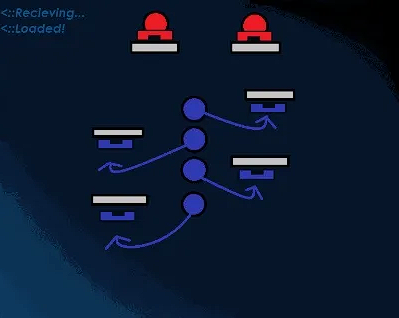
Covered Advance
One or more combatants assume a "base of fire" in order to provide suppressing/covering fire to those who are advancing.
To do so, find a suitable form of cover and fire targeted shots at the enemy, to push them back into cover.
Hallway Peeling
The foremost part of the squad moves into cover to provide covering fire while the back part proceeds into the hallway.
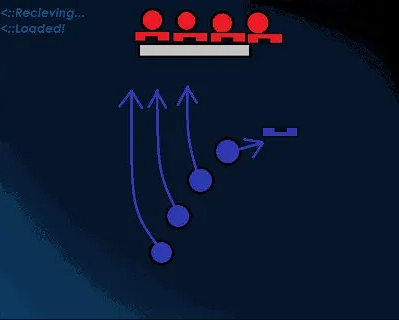
Firing Line
This formation maximizes firepower towards the front. All units are to put themselves in a line formation, suppress the enemy, and advance upon the squad leader's command.
Naturally, suppress from a place of cover before advancing.
Pincer Movement
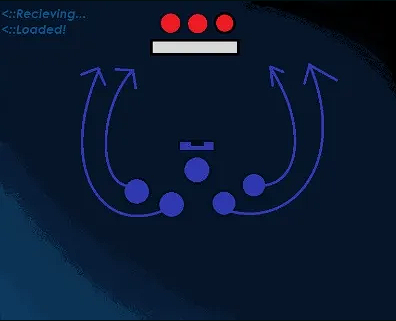
The foremost part of the squad, preferably a shield, advances on the enemy. The rest of the squad stays behind the shield.
All back parts of the squad begin to flank left and right with suppressing fire upon the team leader's command.
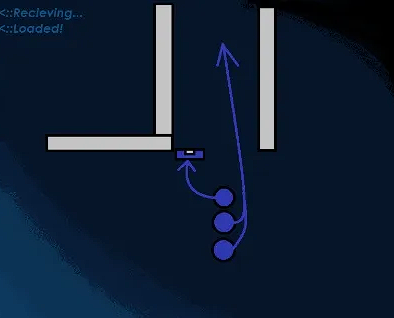
Door Breach (One Space)
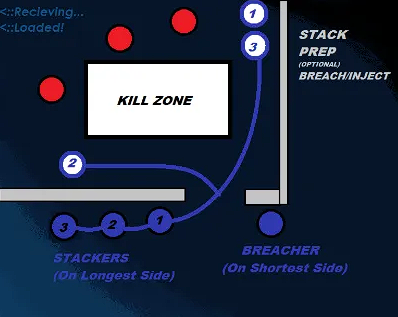
Likely a tactic you'll be utilizing the most.
Door Breach (Two Spaces)
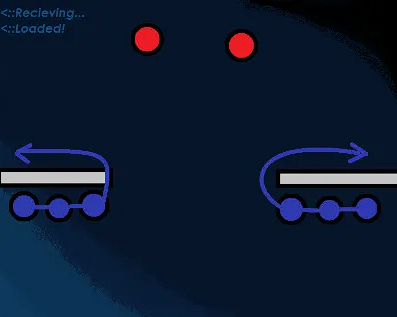
The first stackers on either side assume the role of breachers. Both call for a stack.
Then, the team leader calls for prep and inject. Follow basic principles; shield in front (if possible), avoid the kill zone.
Adopted from Lancer 1. Original guide and images by ParaShock.
You, with the mask! Do you want to be more than a mall-cop with a gun? Do you want to handle threats swiftly and effectively, without losing Integrity to a Lambda-wannabe with a peashooter every sweep?
Now, your life as a CP isn't an easy one. Even though you sit on your ass handling paperwork and being a menace most of the time; sometimes, when push comes to shove, you have to use that kill-bind and risk your life in close-ranged S2K combat. And God knows that when that happens, you don't want to be the embarrassment of the Protection Team by dying first.
Let me give you some insight into real-life inspired CQC tactics that have worked in HL2RP and will, if applied correctly, not only turn you and your colleagues into a force to be reckoned with, but also make your combat more immersive and, hopefully, smoother.
First, some essentials.
1. Before you even engage, use hand signals and gestures to stay coordinated. Use of the /mev or /mec command is paramount in stealth missions. Vocoder beeps travel for miles.
2. Ensure that all of your team members are well-equipped and prepared for a worst-case scenario. Running out of ammo during an encounter or bleeding out out of lack of sufficient medical items is embarrassing. If you're high-ranking, consider the decision to equip your subordinates with better equipment for the sweep, to sway the odds in your favor.
3. Having a unit with riot/shield training on your team is extremely helpful, as sometimes covering fire will not suffice. One shield can be more than enough to provide mobile cover for an entire team while advancing or retreating.
4. When operating in a building, stay out of the "kill zone" (the middle of the room). It makes you extremely vulnerable to surprise attacks. When you flood/breach a room, always move in along the walls, especially if you don't have anyone with a shield on your team.
5. Team Leader defaults to the highest integrity unit in the team. If the Leader is incapacitated, you are expected to make swift decisions to select another.
Covering Fire
Primarily used to hold positions and maneuver before engaging.
Reaction to Contact
Once done, provide covering fire for those at the front. The front combatants move into cover last.
Covered Advance
To do so, find a suitable form of cover and fire targeted shots at the enemy, to push them back into cover.
Hallway Peeling
Firing Line
Naturally, suppress from a place of cover before advancing.
Pincer Movement
The foremost part of the squad, preferably a shield, advances on the enemy. The rest of the squad stays behind the shield.
All back parts of the squad begin to flank left and right with suppressing fire upon the team leader's command.
Door Breach (One Space)
Likely a tactic you'll be utilizing the most.
- One breacher, multiple stackers. The front stacker (1) should have a shield.
- Breacher moves to the shortest wall. Stackers, to the longest.
- Team leader calls stack (get into position), prep (optional), and breach/inject. This can be done with simple hand gestures.
- Breacher opens the door. (By kicking or by hand.)
- The first stacker moves into the opposite wall. If they're a shield, they stay in the doorway for a few seconds to provoke armed hostiles. Then, other stackers move in left and right. Always stick to the walls and avoid the middle of the room ("kill zone").
- Breacher moves in after all stackers are inside, and covers the back.
Door Breach (Two Spaces)
Then, the team leader calls for prep and inject. Follow basic principles; shield in front (if possible), avoid the kill zone.
Adopted from Lancer 1. Original guide and images by ParaShock.